
Custom API access in AWS


Here is a quick and easy introduction on the basics of custom access control for API’s created using API gateway from AWS. Let’s get started 🔐.
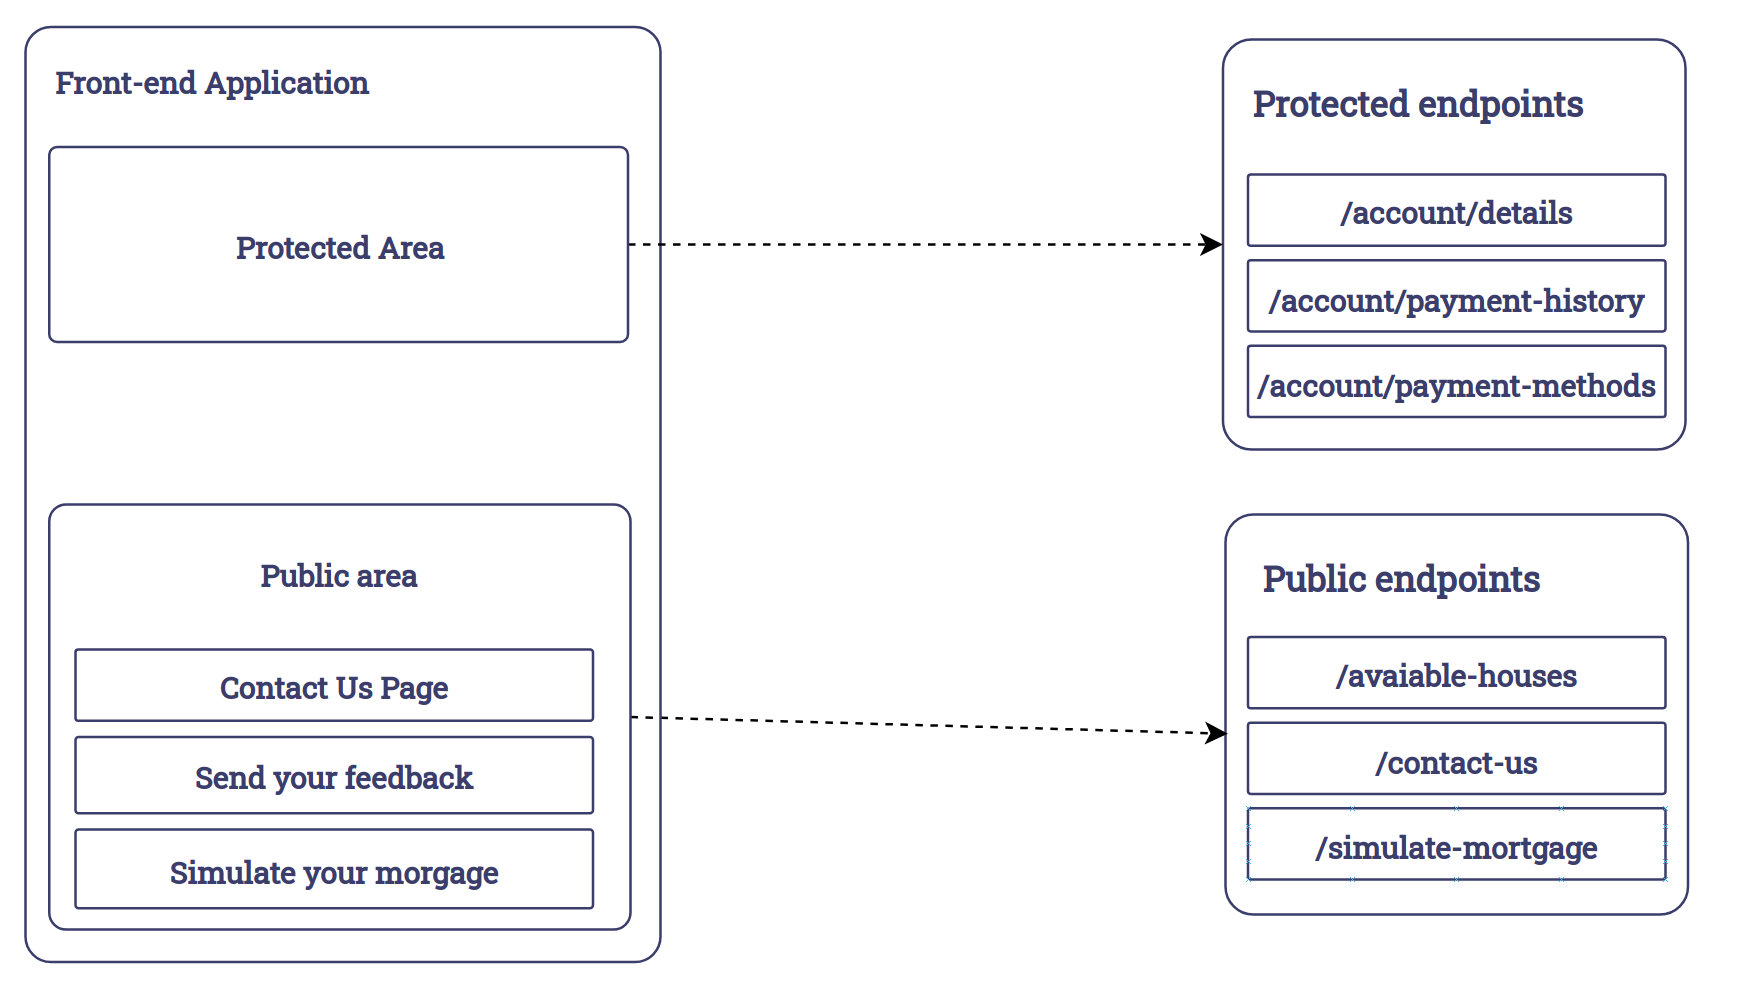
To illustrate the topics we are going to discuss let’s image a simple site for a real state agency. In the site you can view the available homes in the area, you can send feedback to the agency and you can also use their mortgage calculator to simulate the monthly payments. All those actions can be done without setting up an user account. Additionally, there is a my account page where you can see details about your mortgage. To access this area you have request the agency to create an user account. The image below illustrates how their site is implemented.


The site is created as an SPA and makes requests to a serverless API hosted on AWS. The details of how the API is implemented do not matter to us at this point. But in this example, the business logic is implemented in lambda functions and all the persistent data is kept in services like Aurora and S3. We’ll need endpoints that are only accessible to authenticated users for the protected areas of the site. Also, for the public parts of the site we’ll need endpoints that do not required login to be used. The image below illustrates the some of the endpoints we’ll need.

Authenticated Endpoints
For the type of problem we are facing here one of the most ubiquitous strategies for authenticating requests is to use a JWT token. They are quite easy to implement but have rather complex internals. If you would like to understand how they work in depth I recommend taking a look at this post.
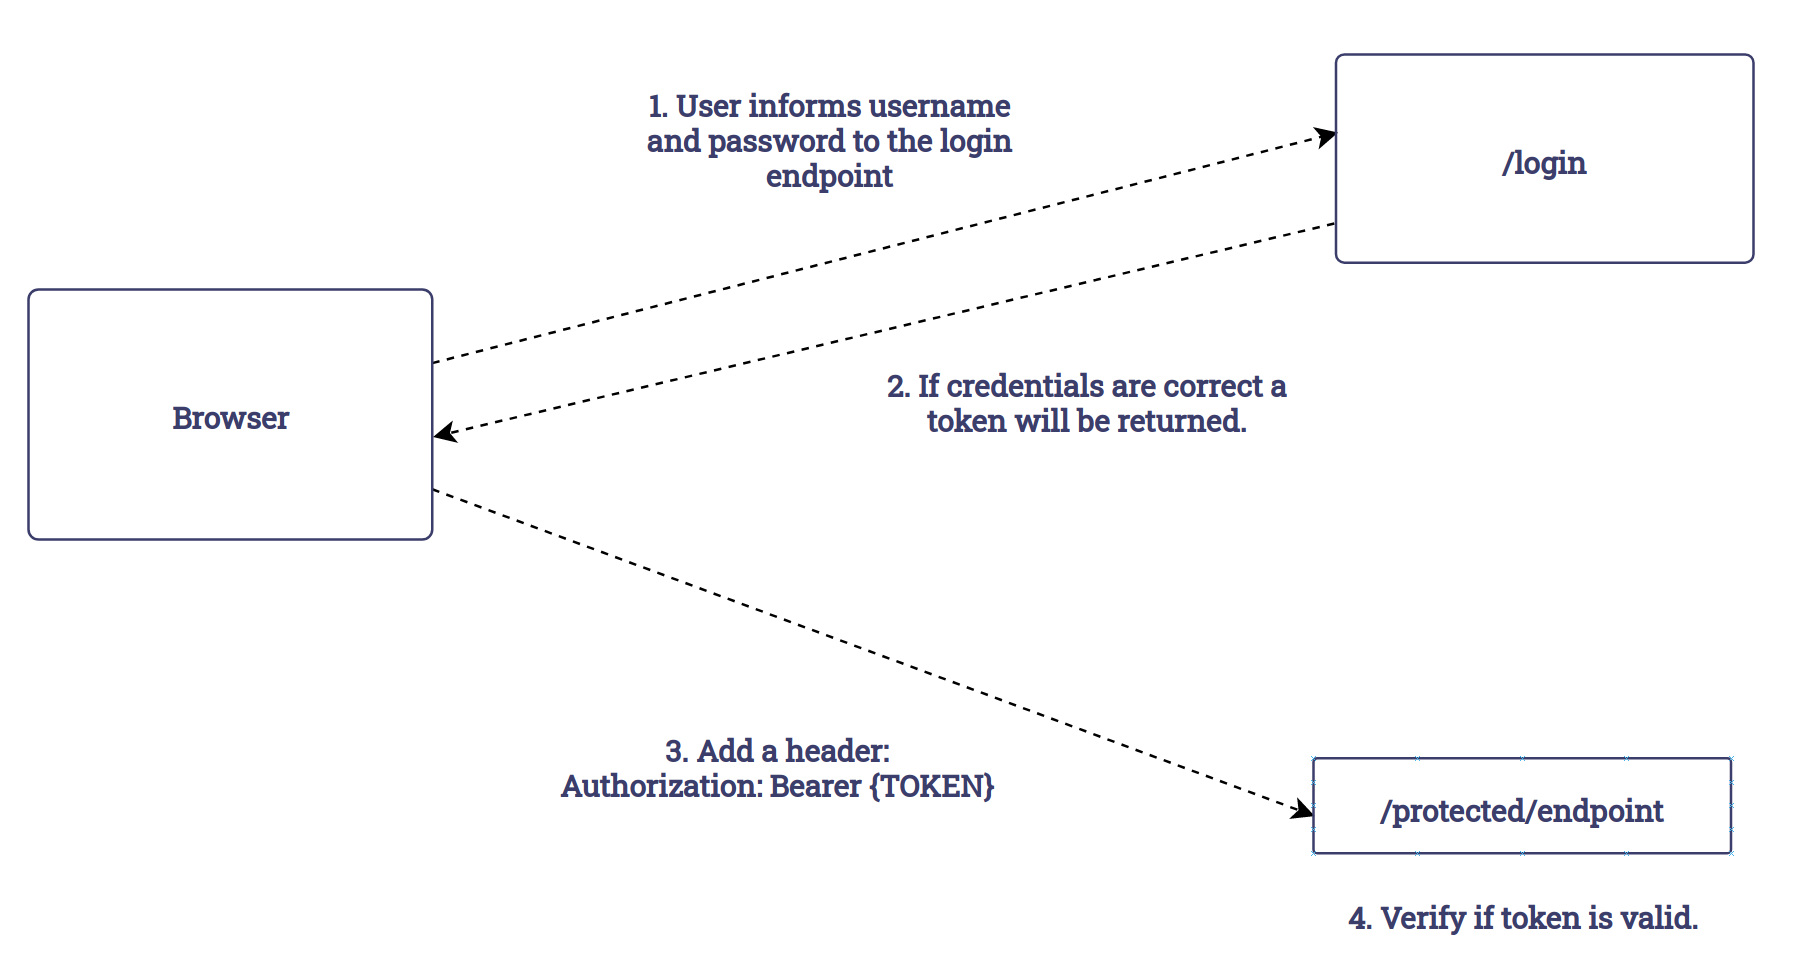
In summary, the user informs the username and password to the browser which will send a request to a login endpoint. If the credentials are correct a token, which is simply a long string, will be returned as the result. From here on out, all the SPA has to do to access any protected endpoint is to add a header to the request in the following format: Authorization: Bearer TOKEN, where TOKEN is the actual string returned by the login endpoint. The endpoint that receives the request can then verify if the token is indeed valid with a simple operation. JWT is constructed in such a way that if you temper with the token or try to create a fake one it is possible to detect. The image below illustrates these steps.

Creating a login function
In this endpoint you’ll verify that the user has provided valid credentials. If so you’ll generate and return a JWT token. The code below is a lambda function implemented in Node.js that performs this operation.

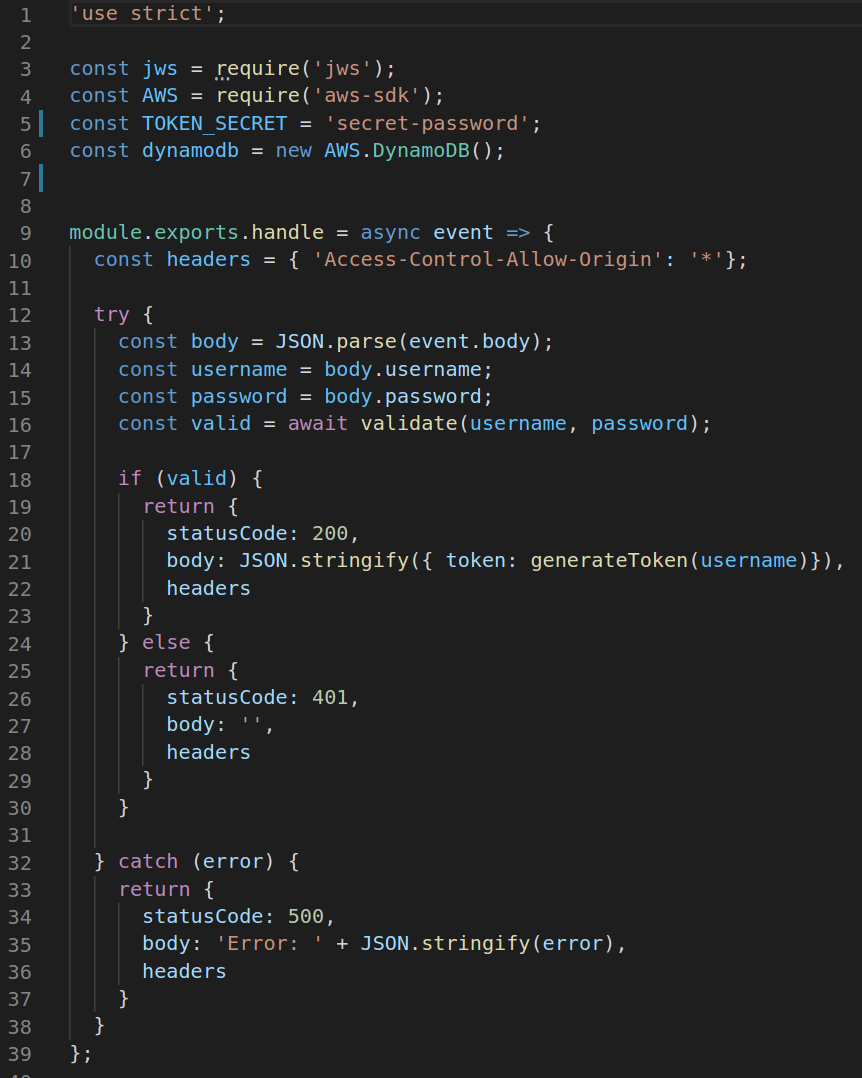
The function “validate” (line 16) was omitted since it’s implementation depends on where your users are stored. But, all it does is return true if the provided credentials are legitimate and false otherwise. Also, it is an asynchronous function which allows you to fetch your users from a remote location if needed.
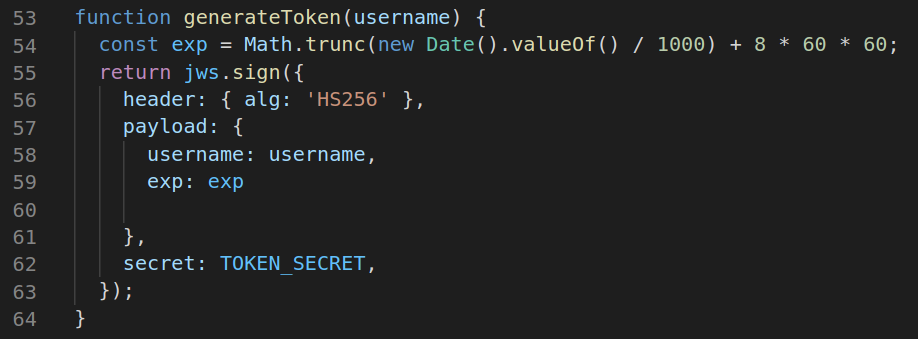
In case the proper credentials are informed the token is generated by the function ‘generateToken’ (line 21). The implementation is detailed in the image below and as you can see it is quite simple. We use the the npm package jws to create the token. The attribute exp is a timestamp for when the token is no longer valid (in our case, 8 hours after its creation). Also, you may add custom attributes in the payload of the token, in our case we added the username. The TOKEN_SECRET is a basically a password that protects your tokens and, as the name implies, must be kept safe.

Verifying if tokens are valid
Once the SPA has this token it is its job to add to the header of requests to protected endpoints. So now let’s create a lambda function that is able to verify the validity of a token.

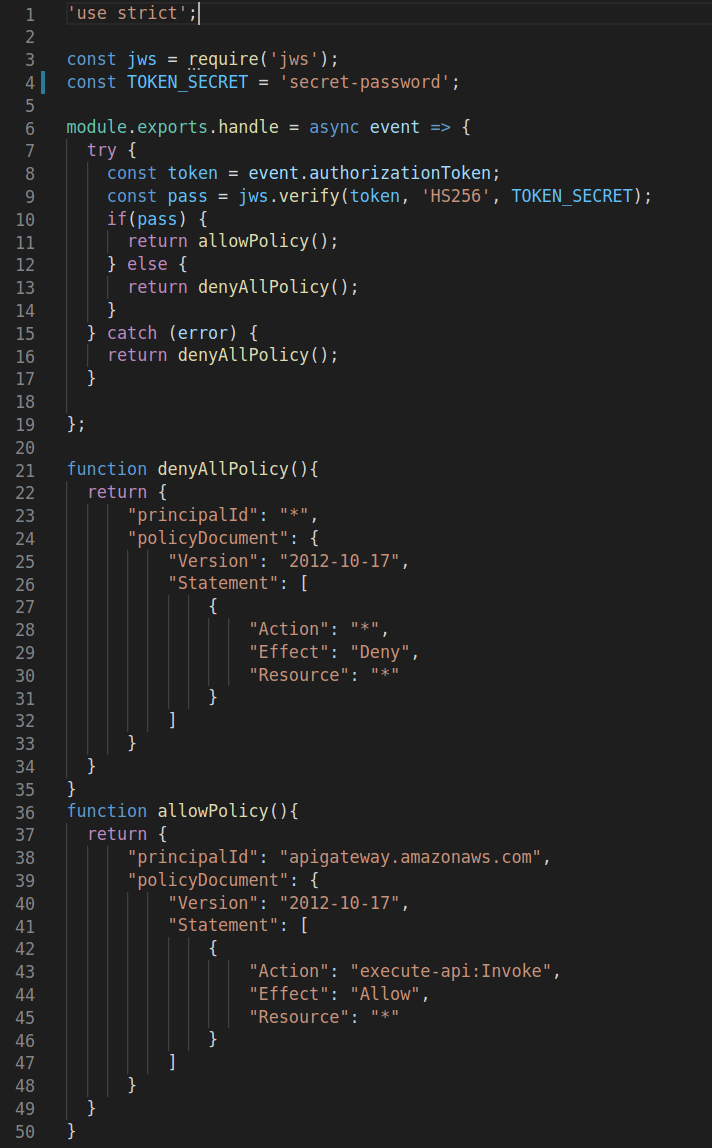
Notice on line 9 we’ve the same jws package to verify that the token is valid using the very same TOKEN_SECRET. It is because of the secret that we know that this token has not been faked. You could only generate this token if you have the secret. AWS will make the token available on the event object as indicated on line 8.
If the credentials are correct you must return an AWS security policy that gives the permissions you would like to grant. In our simple example, we allow the user to invoke every endpoint of any API. You could be more specific and restrict access to particular API’s only or even specific endpoints. Similarly, if the token is not valid, we return a policy that blocks all access.
Creating an Authorizer
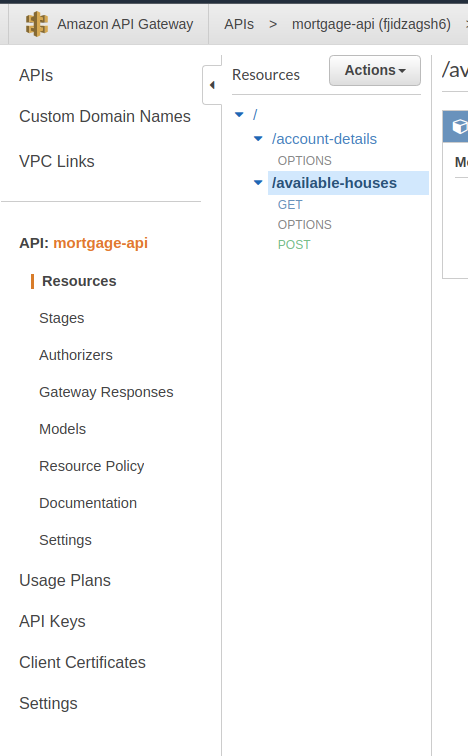
So far we created a basic login endpoint that will generate a token and we have created a lambda function that verifies the validity of a token. However, how can we configure our API to use this function to block unauthorized access ? To do this we need to create an Authorizer. First access your REST API dashboard as indicated below.

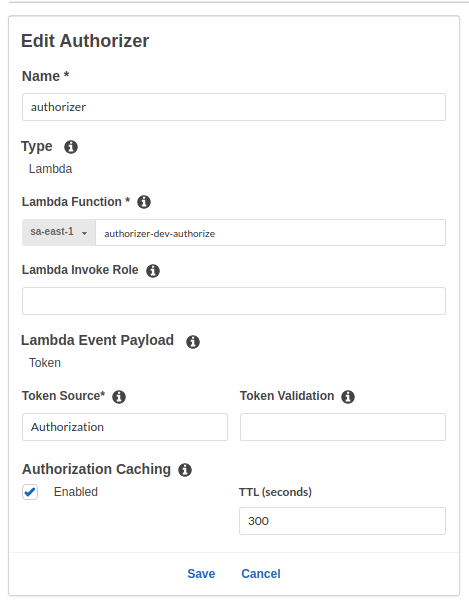
From there, access the Authorizers menu and create a new Authorizer. Give a name and from the dropdown menu select the lambda function you have created in the previous step. In the field, Token Source fill in with ‘Authorization’, this is name of the header where the SPA will insert the token. This could be named anything however the convention is ‘Authorization’. You can leave everything else as is.

Protecting private endpoints
We’re almost there! The last thing to do is tell AWS which endpoints we want to protect. To do this, access the Resources menu in your API dashboard to get a list of all the resources and methods your API has available as illustrated below.

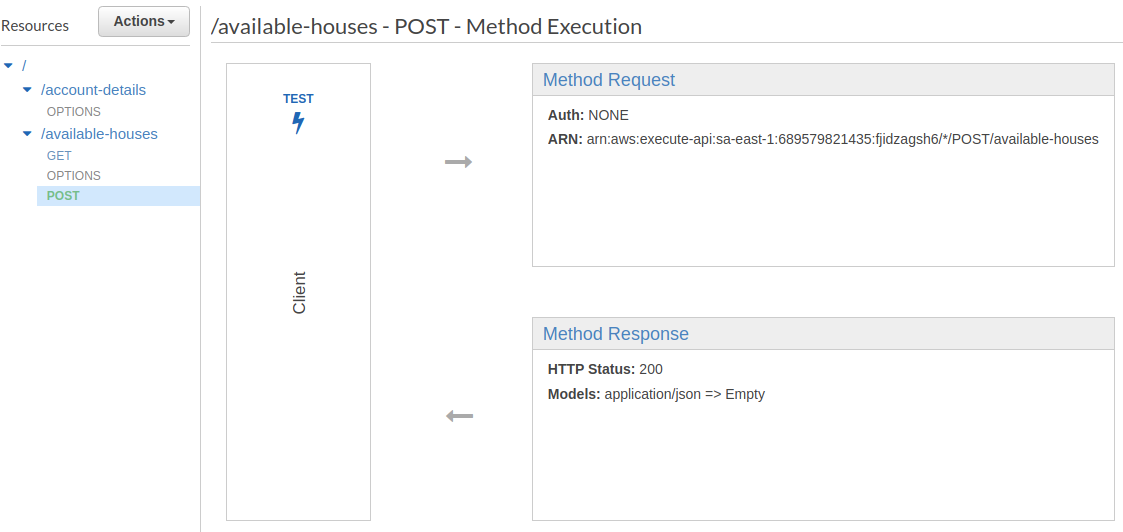
In our example ‘GET /avaiable-homes’ will list all available homes and ‘POST /available-homes’ will allow admins to add a new home. In this case, we would like only authorized users to access the POST method but allow anyone to access the GET method. To do this, select the verb you would like to protect, then click on ‘Method Request’. This will open up a window similar to the one below.

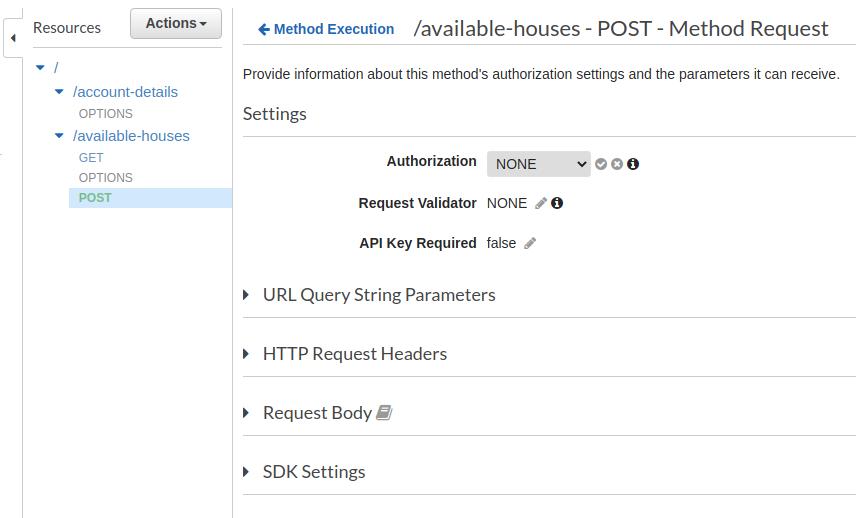
Now simply select the authorizer you have created from the dropdown field Authorization and you are all set! Do this for every endpoint that you would like to protect from public users.
More advanced permission schemes
All you can see with very little effort you are able to add complex behavior to your API. Naturally, this is a basic example where you either have full access to an endpoint or none all. In reality, you might want different levels of clearance based on user type and permission roles. Behaviors such as that can easily be incremented using strategies similar to the ones shown here. For example, based on what clearance a user has, you can add different strings to the payload of the token during creation. Later, when verifying a user’s token, you can check its validity as well as what permission does that token grant the user. This way you can decide whether or not the endpoint will execute. As lost as you check if the token is valid you can trust any information contained within.
Token blacklists
Another clear flaw of our system is that anyone has gains access to one of our tokens will be able to perform any actions for as lost as it is valid, even if the user logout. A common strategy for such cases, is to invalidate tokens once the user associated logs out. A simple way to do this is to create a logout method that adds the token to a black list. Any tokens present in that black list should not be considered valid any longer even if they aren’t technically expired.
API abuse protection
Someone with ill intent can use bots to spam your API and generate a rather large bill in your AWS account. API has two tools are very easy to configure are quite effective against most basic attacks: API throttling and Usage Plans. You can configure throttling by going to the stages menu of your API dashboard.

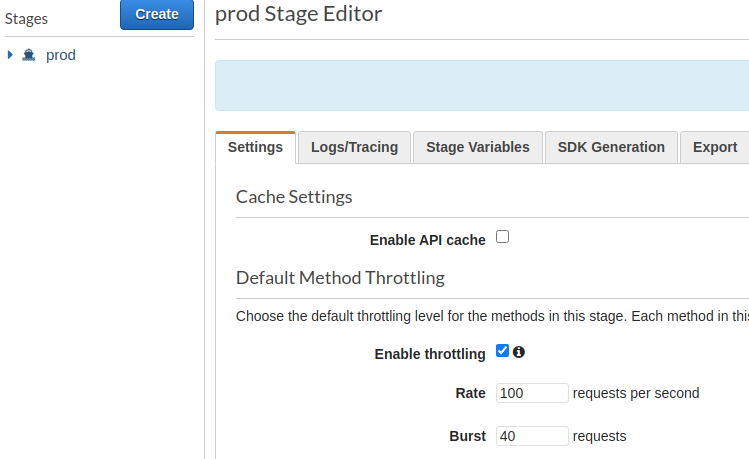
These settings would give you a level of protection against spamming, be sure do adjust these number according to your API reality. The second tool, Usage plans, allows you to defined a global quota per day/week/month. This gives you more fine-tuned control and protection. The setup for this one involves a few steps. First, create and API key through the API Keys menu. Second, make an API key required on every method through the method execution settings. The final step is to create an usage plan where you’ll define your quota, associate the key, and select the stage of your API. Done!
And that concludes the end of this post! I hope you found this to be useful 👨🏻💻. In case you would like to get in touch: linkedin.
THE BLOG
News, lessons, and content from our companies and projects.
41% of small businesses that employ people are operated by women.
We’ve been talking to several startups in the past two weeks! This is a curated list of the top 5 based on the analysis made by our models using the data we collected. This is as fresh as ...


Porto Seguro Challenge – 2nd Place Solution
We are pleased to announce that we got second place in the Porto Seguro Challenge, a competition organized by the largest insurance company in Brazil. Porto Seguro challenged us to build an ...
Adriano Marques
CEO at XNV

Predicting Reading Level of Texts – A Kaggle NLP Competition
Introduction: One of the main fields of AI is Natural Language Processing and its applications in the real world. Here on Amalgam.ai we are building different models to solve some of the problems ...
João Paulo Martins
Data Scientist XNV

Porto Seguro Challenge
Introduction: In the modern world the competition for marketing space is fierce, nowadays every company that wants the slight advantage needs AI to select the best customers and increase the ROI ...
João Paulo Martins
Data Scientist XNV

Sales Development Representative
At Exponential Ventures, we’re working to solve big problems with exponential technologies such as Artificial Intelligence, Quantum Computing, Digital Fabrication, Human-Machine ...

Rodolfo Egarter
COO @ Pluo

Exponential Hiring Process
The hiring process is a fundamental part of any company, it is the first contact of the professional with the culture and a great display of how things work internally. At Exponential Ventures it ...
Rodolfo Egarter
COO @ Pluo
Exponential Ventures annonce l’acquisition de PyJobs, FrontJobs et RecrutaDev
Fondé en 2017, PyJobs est devenu l’un des sites d’emploi les plus populaires du Brésil pour la communauté Python. Malgré sa croissance agressive au cours de la dernière année, ...
Adriano Marques
CEO at XNV

Exponential Ventures announces the acquisition of PyJobs, FrontJobs, and RecrutaDev
Founded in 2017, PyJobs has become one of Brazil’s most popular job boards for the Python community. Despite its aggressive growth in the past year, PyJobs retained its community-oriented ...
Adriano Marques
CEO at XNV

Sales Executive
At Exponential Ventures, we’re working to solve big problems with exponential technologies such as Artificial Intelligence, Quantum Computing, Digital Fabrication, Human-Machine ...
Rodolfo Egarter
COO @ Pluo

What is a Startup Studio?
Spoiler: it is NOT an Incubator or Accelerator I have probably interviewed a few hundred professionals in my career as an Entrepreneur. After breaking the ice, one of the first things I do is ask ...
Adriano Marques
CEO at XNV

Social Media
At Exponential Ventures, we’re working to solve big problems with exponential technologies such as Artificial Intelligence, Quantum Computing, Digital Fabrication, Human-Machine ...
Rodolfo Egarter
COO @ Pluo

Hunting for Unicorns
Everybody loves unicorns, right? But perhaps no one loves them more than tech companies. When hiring for a professional, we have an ideal vision of who we are looking for. A professional with X ...
Rodolfo Egarter
COO @ Pluo
Stay In The Loop!
Receive updates and news about XNV and our child companies. Don't worry, we don't SPAM. Ever.
