
Creating a Kubernetes environment on AWS with kOPS

Rhuan Silva
Former Tech. Lead at XNV

Have you ever wondered about deploying a cluster controlled by Kubernetes on AWS (or any other Cloud Provider) without suffering? Well, this post is definitely to you.
I won’t compare tools or methods like Terraform, CloudFormation and many others. This is just a simple post about deploying a cluster, managed by Kubernetes, using the most basic commands and enabling Rolling Updates, with kOPS.
In order to accomplish this we are going to need a few things, like a small API and some integrations. Fortunately, I’ve already created a NodeJS API to use here. There it is: https://github.com/rhuankarlus/kops-tutorial
For this API I used the following technologies:
- Nodejs
- Hapi JS
- MongoDB
- Pino
- Docker
Pretty simple, right? If you’re not familiarized with some of these, you can check the bibliography links.
Preparing the environment
Here we’re going to configure our Local and AWS Environments. You’ll need to install some dependencies to proceed, but don’t be afraid, they’re all trustable.
Installing AWS CLI
Installing AWS CLI tool is very simple and the documentation provides all you need to do it, so I’ll just let it here: https://docs.aws.amazon.com/cli/latest/userguide/install-cliv2.html
Installing JQ
You’ll need JQ to parse AWS API tokens. Here is how you can do it: https://stedolan.github.io/jq/download/
Installing Kubernetes
You can follow the official documentation to install Kubernetes: https://kubernetes.io/docs/tasks/tools/install-kubectl/
Installing kOPS
Installing kOPS is also a simple task and the documentation is very clear: https://kops.sigs.k8s.io/getting_started/install/
Set up your AWS and Local Environments
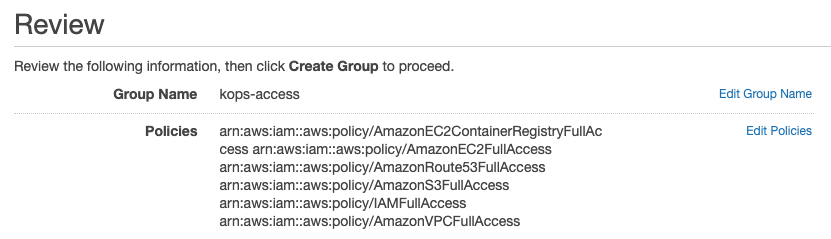
To start building the cluster, you’ll need to provide kOPS access to your AWS account. To do so, just create a kOPS user on your AWS account, this user will need all the following permissions:
- AmazonEC2ContainerRegistryFullAccess
- AmazonEC2FullAccess
- AmazonRoute53FullAccess
- AmazonS3FullAccess
- IAMFullAccess
- AmazonVPCFullAccess
Go to your AWS and create a new group, let’s call it kops-access. You can do so going to IAM -> Groups -> Create New Group. Click on next and on the policy screen you can search for them. Just check them all and click on Next Step. You should see something like that:

Now let’s put a user on this group, let’s call this user kops-user. Go to IAM -> Users -> Create New User. This user needs programatic access to AWS, so remember to check the right option when creating it. At the end you should see something like this:

It is important to note that all the above steps can be done using the almighty aws command line tool, but for this tutorial I tried to keep things as simple as I could without more commands than we really need (not that I don’t like automation, on the contrary I love it, I just chose to not use it this time). Do not forget to hold this user access key and secret, and PLEASE keep them safe.
By default kOPS uses two environment variables in order to connect to AWS and we need to connect to AWS programmatically too. So let’s edit the file ${HOME}/.aws/credentials and add a new entry (you can also do it programmatically, but I intend to do it all manually in this tutorial), I’ll call it kops but you can call it whatever you want. This entry will hold kOPS credentials to access the AWS API, it should be something like this:


After you did that, please export the AWS kOPS variables like that:


Done! your local environment is ready, now we can proceed to the next step.
DNS Considerations
In this tutorial I’ll use a subdomain of my personal domain (rhuka.com) to create the cluster. Here are the options:
- If you have a valid domain registered on AWS and want to use it for this tutorial, you can skip this section and go to the “Creating the cluster”
- (This is the approach we’re going to follow in this tutorial) If you have a valid domain registered on Route53 and want to use a subdomain of it please go to the section “Configuring DNS subdomain”
- If you have a valid domain on another DNS Provider (e.g. GoDaddy), and you want to move it to AWS, all you need to do is create to create a Hosted Zone and register the Name Servers on your GoDaddy DNS configuration. If you don’t know how to do that I suggest taking a look at this quick tutorial: https://www.youtube.com/watch?v=zFuluVTsF14 If you face any trouble with the above step (which I don’t think you will), please take a read at AWS documentation in here: https://docs.aws.amazon.com/Route53/latest/DeveloperGuide/domain-transfer-to-route-53.html
- If you have a valid domain on another DNS Provider (e.g. GoDaddy) and want to keep it there, this is what you must do: https://kops.sigs.k8s.io/getting_started/aws/#scenario-3-subdomain-for-clusters-in-route53-leaving-the-domain-at-another-registrar When you come back please go to the “Creating the cluster” section.
- If you do not have a valid domain you still can create your cluster on AWS, but you’ll need to follow the kOPS tutorial and then come back later: https://kops.sigs.k8s.io/getting_started/aws/#scenario-3-subdomain-for-clusters-in-route53-leaving-the-domain-at-another-registrar When you come back please go to the “Creating the cluster”
Configuring DNS subdomain
To start, you’ll need to create a hosted zone for your subdomain. Now for my case my domain is rhuka.com so I am going to use kops.rhuka.com (don’t forget to change this to your current domain and desired subdomain) as my subdomain. This is the command you should run:
ID=$(uuidgen) && aws route53 create-hosted-zone --name kops.rhuka.com --caller-reference $ID | jq .DelegationSet.NameServersYou should see something like that:


Now we need to add this record to our parent Zone. To do so we need to create a json file with the subdomain’s zone name servers. Go and create a file (in my case I just created a subdomain.json file) with the above values, like that:


Note that the Name attribute references my own subdomain and the values of each ResourceRecords are the NS values returned before. Now we need to get our parent zone ID. To do that we’re going to use the following command (replace rhuka.com with your own domain):
aws route53 list-hosted-zones | jq '.HostedZones[] | select(.Name=="rhuka.com.") | .Id'And you should see something like that:


Nice, now we only need one command to set this records to our parent’s zone:
aws route53 change-resource-record-sets --hosted-zone-id /hostedzone/Z102538021XOWXE1R13BX --change-batch file://subdomain.jsonIf everything works fine, you will be presented with something like:


You can make sure everything worked fine by going to your AWS Console and check the records on your Route53 Hosted Zone. There you’ll find a new entry with the subdomain hosted zone records.
Creating the cluster
To create the cluster we need a way to store the cluster state. We’re going to do that using the AWS CLI to create a S3 Bucket. After that we can create the cluster, but keep in mind that you should be careful when selecting a region. Right now we have created the Route53 Hosted Zones and they are all global, but from now on we must choose a region. and for this example I’ll be working with the us-east-1 region. Let’s do it.
Creating the S3 Bucket to store the cluster state
For this example I’ll create a bucket called kops-rhuka-com-state-store but you can call it whatever you want. You can create a Bucket by running this command:
aws s3api create-bucket --bucket kops-rhuka-com-state-store --region us-east-1If everything works fine, you’ll see something like:


The kOPS team recommend to version this bucket, it’s a single line command, you can do it by just:
aws s3api put-bucket-versioning --bucket kops-rhuka-com-state-store --versioning-configuration Status=EnabledThere’s no need to encrypt this Bucket content unless if you’re running a production environment. You can do the encryption by running this command:
aws s3api put-bucket-encryption --bucket kops-rhuka-com-state-store --server-side-encryption-configuration '{"Rules":[{"ApplyServerSideEncryptionByDefault":{"SSEAlgorithm":"AES256"}}]}'I won’t use encryption, but you should face no issues by doing it.
Creating the cluster with kOPS
Alright, so now we need to create our EC2 instances using kOPS. For this example I’m going to create one master and two nodes for our k8s environment. Let’s start.
You can create the cluster configuration by running this command:
kops create cluster --name kops.rhuka.com --state s3://kops-rhuka-com-state-store --cloud aws --master-size t2.small --master-count 1 --master-zones us-east-1a --node-size t2.medium --node-count 2 --zones us-east-1a,us-east-1bNote that this command will only generate the configuration of the cluster, and not the cluster itself. It creates two nodes, one in each availability zone selected, and one master. The size of the master can be a bit smaller than the nodes, since it will not handle many operations, but the nodes must be a bit larger because we are going to deploy an API and a database on them (please, do not deploy a database this way on AWS, this is just an example, I hope you never do this in production, you can use RDS or some other database as a service with replication and backup configurations).
Now, if everything worked correctly you should see the list of instances, VPCs, users, all the resources that will be created on AWS, and message informing that you must run the command update to create the resources. Also, if you need to change something, you’ll be presented with a message with some handful commands:
Suggestions: * list clusters with: kops get cluster * edit this cluster with: kops edit cluster kops.rhuka.com * edit your node instance group: kops edit ig --name=kops.rhuka.com nodes * edit your master instance group: kops edit ig --name=kops.rhuka.com master-us-east-1aNow, to approve this cluster configuration we need to run the following command (please note that when you run this command, kOPS will create a new context on your ${HOME}/.kube/config file, this is the configuration to access your k8s cluster):
kops update cluster --name kops.rhuka.com --state s3://kops-rhuka-com-state-store --yesIt shouldn’t take too long, your cluster will be created, once it is created you can validate the state of the cluster by running:
kops validate cluster --state s3://kops-rhuka-com-state-store --wait 10mThis command will wait for ten minutes until your cluster gets HEALTHY. At the end of the healthy check you should see a message telling you that the cluster is now ready. Something like this:

Amazing right? Now we can start deploying things here with kubectl.
Deploying the API with kubectl
Let’s think together. Given that we want to deploy the API, which will be inside of a docker image, our cluster must have access to the registry containing the image right? It would be very easy to do that using Dockerhub but what if you want to deploy a private image? Maybe you want to keep things on the same place? For this example we’re going to use Amazon Elastic Container Registry to hold our images (if you want to use Dockerhub go ahead to the “Deploying the ECR token Job” section because you won’t need any credentials to access a public image). Now thinking about that we need to set up a job that will get the ECR’s access token and renew it from time to time (if I’m not mistaken, the ECR’s token expires from 12 to 12 hours).
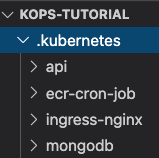
To do the k8s deployments, I have already created a directory on our datasource with the name .kubernetes and there you’ll find all the deployment files used in this tutorial.

Creating the ECR registry
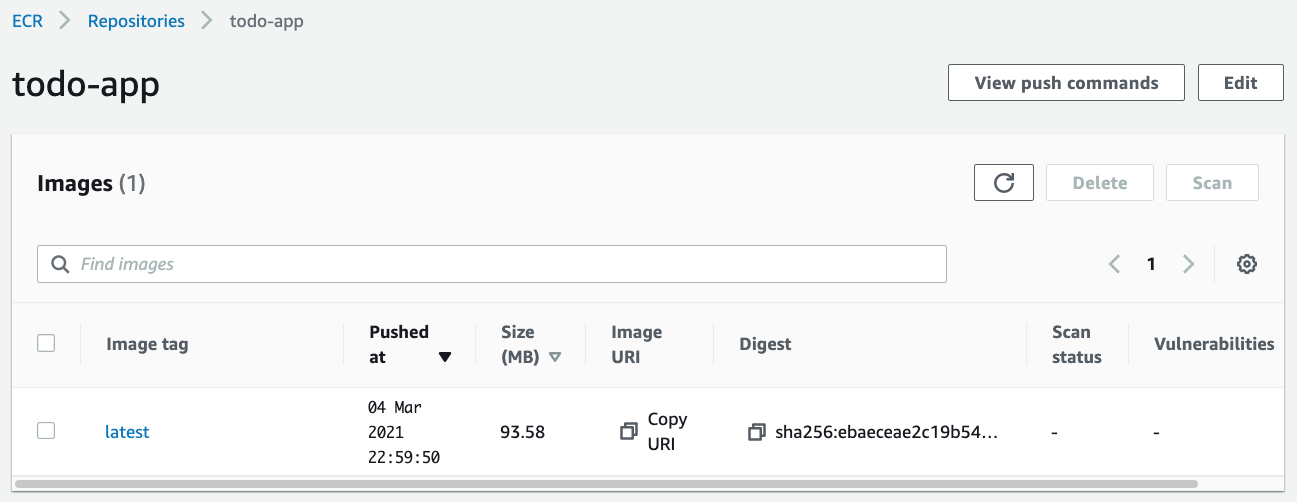
On your AWS Console, go to the “Elastic Container Registry” service. There you can click on “Get Started” if you never created a registry or “Create repository” if you already did it before. Create a private repository and put the name of your app on the name field, for our case I’m going to use todo-app for the name of the repository.
About the Tag immutability I wouldn’t check this option that fast as you probably want to do, and I’ll tell you why. If you enable this option you will not be able to update an image tag already uploaded, now think with me, if you can’t do that you will never be able to update the latest tag, right? To do that you’ll need more engineering on your CI/CD system to remove the tag before submitting a new one. This can be very useful if you never deploy the latest tag, and if you want to make sure that no ones on the SysOps team will ever commit, by mistake, changes to a tag (given that we shouldn’t do it anyways).
I’ll also let the scan and encryption flags disable here. To keep things simple, but you can enable them if you want or need. Now that your repository was create you can click on it and you’ll notice a button on the top right of the screen with the label “View push commands”. Don’t be shy, go and click on it. A new modal will open with the commands to properly build and push a new image to your own private repository. Thank you AWS. What are you waiting for? Let’s deploy the API’s image.
Uploading the API’s docker image to ECR
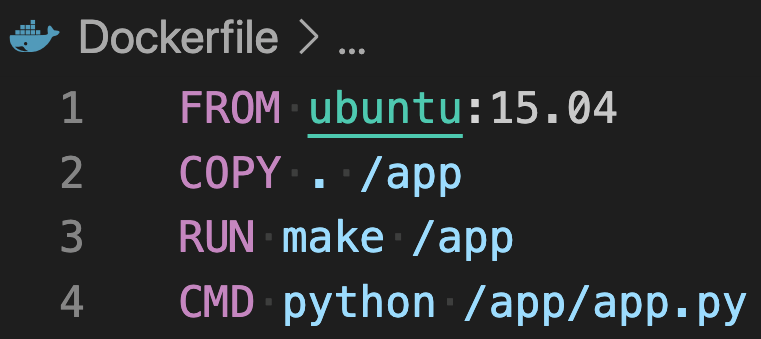
We must build our image using the docker build command. Just go to the source code and run this command:
docker build --file Dockerfile.prod -t todo-app .Note that we’re using a customized Dockerfile, this is because we have two Dockerfiles, one for development and another for production mode. After the creation of the image you must get access to your ECR repository, you can run the following command to get your ECR credentials on docker:
aws ecr get-login-password --region <your-repository-region> | docker login --username AWS --password-stdin <your-aws-account-code>.dkr.ecr.<your-repository-region>.amazonaws.comGreat, now you should be logged in successfully. Let’s upload our image with:
docker tag todo-app:latest <your-aws-account-code>.dkr.ecr.<your-repository-region>.amazonaws.com/todo-app:latest && docker push <your-aws-account-code>.dkr.ecr.<your-repository-region>.amazonaws.com/todo-app:latestLet’s take a look at our repository, you should see the app’s docker image there.

Deploying the Ingress Controller
I like to use Nginx Ingress Controller, it is widely used and documented. Here you can find the documentation: https://kubernetes.github.io/ingress-nginx/deploy/#aws Unfortunately this yaml file considers that you’re using EKS (which is probably the best option ever, but I’m considering that you really need to use kOPS in here).
What I really like to do in such cases is download the entire yaml source file and store it locally, this can help you to keep track of any changes on your cluster. But to keep it simple let’s use the documentation yaml. Because of that you can simply run this command inside the .kubernetes directory:
# create the mandatory linked role to create LoadBalancersaws iam create-service-linked-role --aws-service-name elasticloadbalancing.amazonaws.com# create the namespace and the resources for our nginx ingresskubectl create namespace ingress-nginx && kubectl apply -f ingress-nginxAfter the above command we the ingress controller will be deployed and if you run the command kubectl get all -n ingress-nginx you should see something like:

Note that a Load Balancer was created, we can use this to reach our API. But slow down, we need to deploy our ECR token Job first, remember?
Deploying the ECR token Job
This cron job will keep asking for the ECR token each sic hours and there are many ways of doing it. The most common way I’ve found on web is by deploying this job like in this gist: https://gist.github.com/ebongzzang/beb6db6db3f44528b1c84d433372e10f
Now, I’ve already done the hard work of keeping this locally for you, all you need to do is deploy the cron job inside the .kubernetes/ecr-cron-job directory. Let’s do it together, we must change some variables before we deploy this cron job. Edit the .kubernetes/ecr-cron-job.yaml and change the values of the given variables:
- YOUR_AWS_ACCOUNT_CODE: this is the code your user uses to login on it’s AWS account
- YOUR_ECR_REPOSITORY_REGION: this is the region of your repository (e.g. us-east-1)
- YOUR_DEFAULT_REGION_HERE: now this can be the same of your previous AWS account code
- YOUR_USER_AWS_SECRET_ACCESS_KEY: the secret access key of your kOPS user will be fine
- YOUR_USER_AWS_ACCESS_KEY_ID: same here, you can use your kOPS user access key ID
After doing this, you are ready to apply your cron job yaml. Do it by running the command:
kubectl apply -f ecr-cron-jobAwesome, but there’s a problem here. This job was scheduled to run each 6 hours, and we need this token now, so how can we create an instance of this job and not wait 6 hours? Should we edit the yaml and deploy it again? Not so far kiddo, you can do it by running the next command:
kubectl create job --from=cronjob/ecr-credentials-recovery-job ecr-credentials-recovery-jobOh yeah, this will instantiate a brand new Job for you. Let’s check if it worked? We must check the job completion and if the secret was created on our k8s context.


Beautiful isn’t it? We’re ready to deploy our app, but let’s move one step back, because our app needs a database first.
Deploying the Database
No secrets this time, no jokes, the database deployment files are ready and you need to configure nothing now. I know you’re feeling relaxed now. This is a MongoDB instance and we’re going to deploy it on our k8s environment. Let’s do it together again? Run this command on the .kubernetes directory:
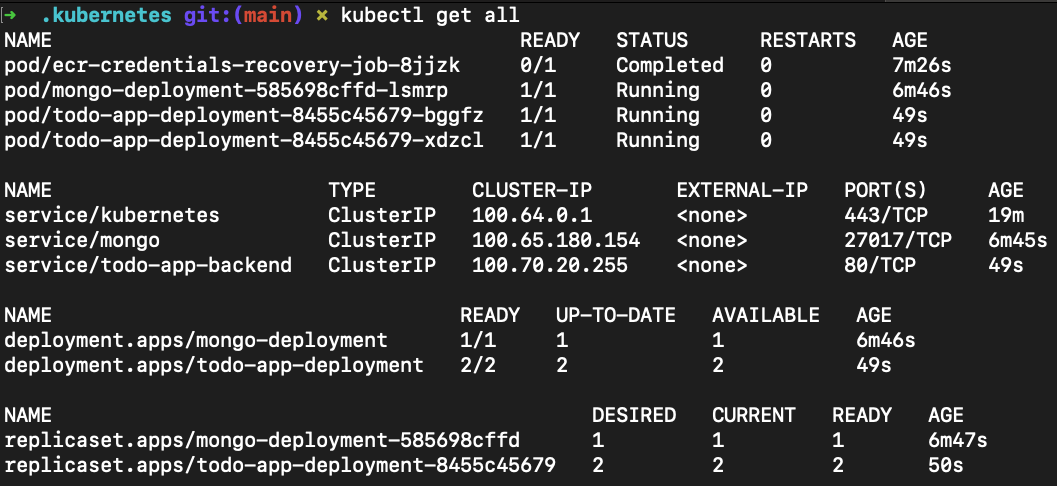
kubectl apply -f mongodbIt will create a configmap with the environment variables to create a user and a password for our MongoDB instance. It will also create a deployment and a service to connect with the container. You should see something like this:


Now our database should be up and running, if you want to check, run the command kubectl get po and you will see it. Let’s move on.
Deploying the API
Now before we deploy our API we must change some variables on the .kubernetes/deployment file. Here is the list:
- YOUR_AWS_ACCOUNT_CODE: this is the code your user uses to login on it’s AWS account
- YOUR_ECR_REPOSITORY_REGION: this is the region of your repository (e.g. us-east-1)
Also, on the .kubernetes/ingress.yaml there is some stuff to change. Go there and put your own DNS on the host key.
Fine, now you can simply run the below command inside the .kubernetes directory and the API shall be deployed without issues:
kubectl apply -f apiNow our API is running and it seems to be successfully connected to the database. Otherwise it wouldn’t start.

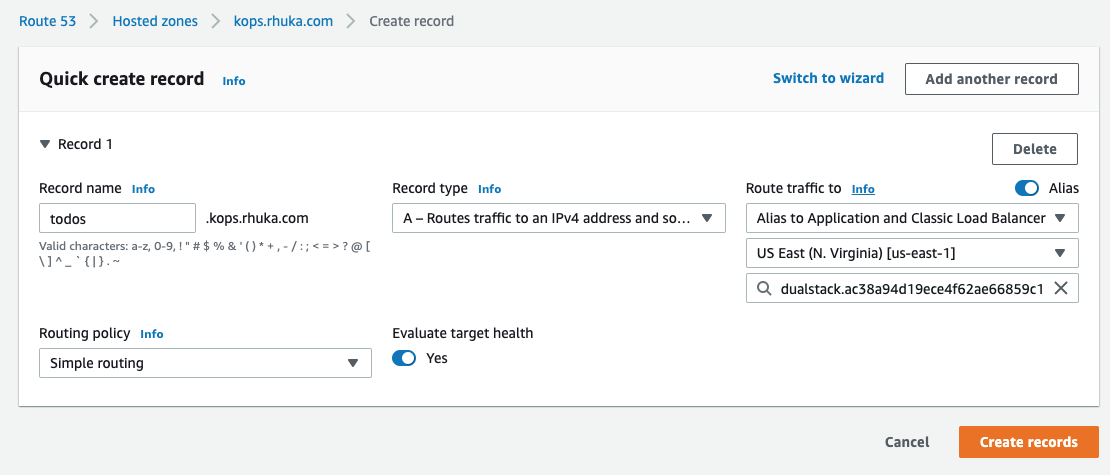
Now what?! Well, now we just need to add the APIs address to our Route53 and it will be available over the internet. Go to the Route53 screen, open our kOPS Hosted Zone and add a new entry pointing to our previously created Load Balancer DNS.

Let’s try it? Go ahead, open your postman and try to create a TODO entry.

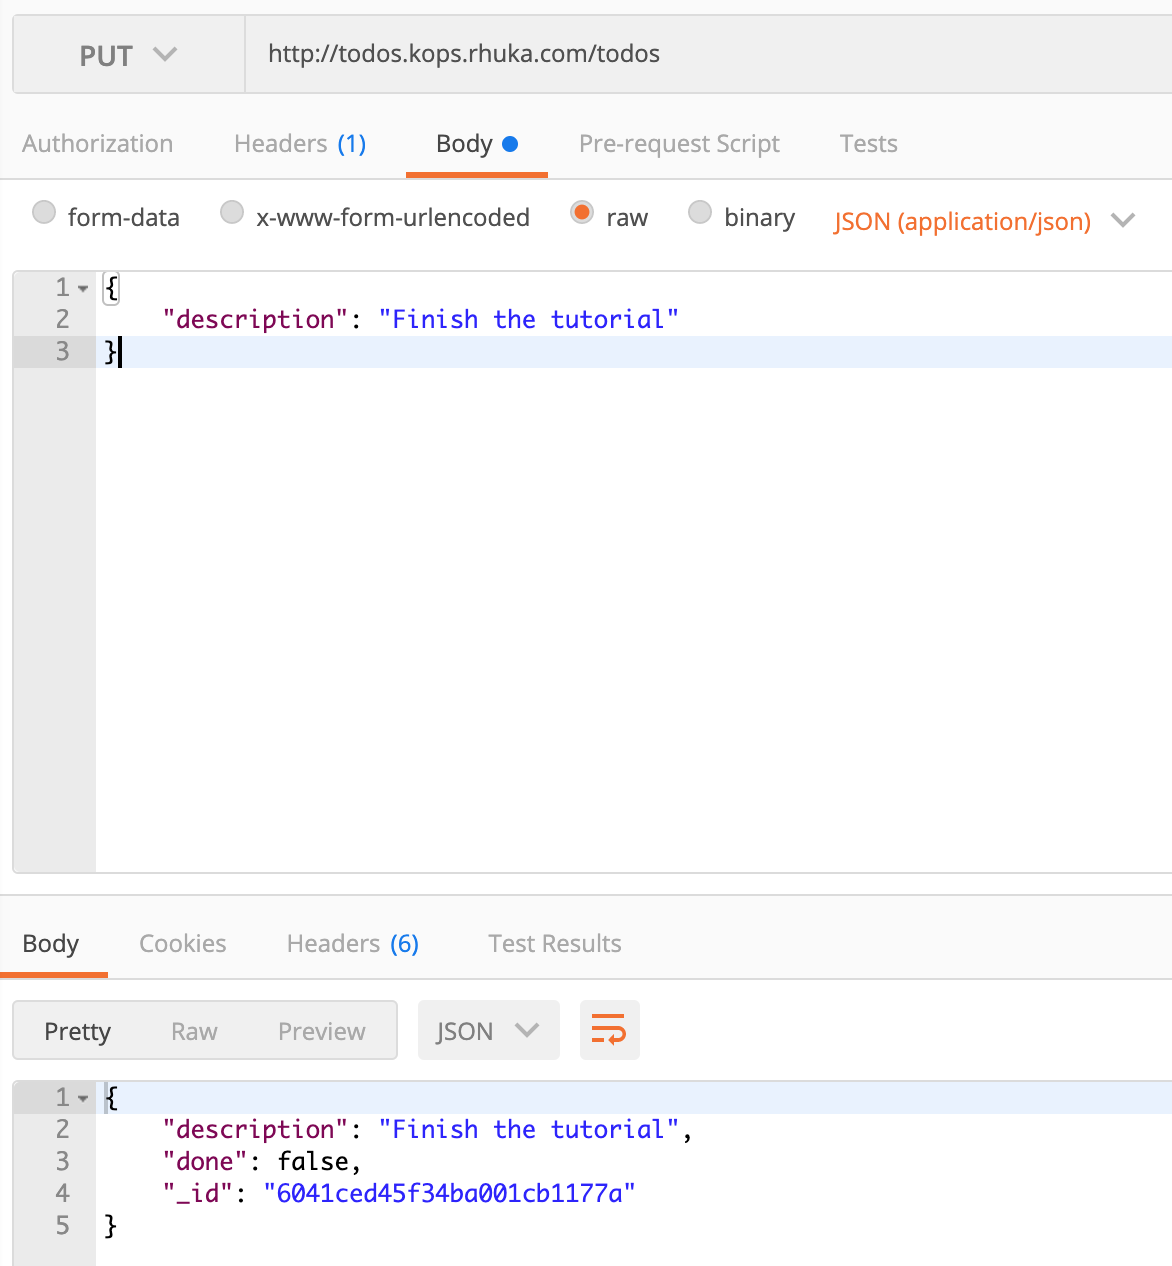
Oh yeah, our baby is alive.
Destroying the Cluster
Tired of playing? No worries, just run
kops delete cluster --name kops.rhuka.com --state s3://kops-rhuka-com-state-store --yesand your cluster will be entirely destroyed (don’t forget to use your own variables heheh).
Next Steps
It was a huge tutorial but there are many more I wanted to show. But this post is already too long… Here’s a list of what we could do to improve this tutorial:
- SSL Verification
- Rolling Updates for the API
- CI/CD configuration to keep things deployed
- Script to automate the creation and destruction of the cluster
- Volumes creation for the database
I intend to do all of these steps and I’ll share with you on my personal Linkedin (link on Conclusion).
Conclusion
Creating a cluster with kOPS can be a bit hard at the first sight but it is not. We can automate the creation and deletion of all the resources using the command line tools in this tutorial. If you are about to start working with Kubernetes and want a place to start, with this content you can build your own SandBox and learn a lot of things. But if you’re going to use it on production I really recommend EKS because it can save you time and hours without sleep.
Last but not least, Kubernetes is not a Silver Bullet ok? You still can solve problems like elastic scaling without it. Go for it, if you really need this kind of control over your company’s infrastructure. Believe me my friend, all that glitters is not gold.
With this tutorial you’ll be ready to build your own personal k8s cluster, I hope it helped you on finding a way. Please get in touch via Linkedin if you need anything or have other suggestions about coding/DevOps/coffee -> https://www.linkedin.com/in/rhuankarlus/
Thanks for reading.
Bibliography
- https://github.com/rhuankarlus/kops-tutorial
- https://medium.com/@tundebabzy/how-to-use-typescript-with-hapijs-c0d074e34321
- https://losikov.medium.com/part-1-project-initial-setup-typescript-node-js-31ba3aa7fbf1
- https://losikov.medium.com/part-2-express-open-api-3-0-634385c97a4e
- https://www.digitalocean.com/community/tutorials/how-to-build-a-node-js-application-with-docker
- https://www.npmjs.com/package/mongodb
- https://www.twilio.com/blog/guide-node-js-logging
- https://github.com/pinojs/hapi-pino
- https://kops.sigs.k8s.io/
- https://www.youtube.com/watch?v=zFuluVTsF14
- https://docs.aws.amazon.com/cli/latest/userguide/install-cliv2.html
- https://kops.sigs.k8s.io/getting_started/install/
- https://www.replex.io/blog/the-ultimate-guide-to-deploying-kubernetes-cluster-on-aws-ec2-spot-instances-using-kops-and-eks
- https://hub.docker.com/
- https://aws.amazon.com/pt/ecr/
- https://kubernetes.io/docs/tasks/tools/install-kubectl/
- https://kubernetes.github.io/ingress-nginx/deploy/#aws
- https://gist.github.com/ebongzzang/beb6db6db3f44528b1c84d433372e10f
- https://www.poeticoding.com/create-a-high-availability-kubernetes-cluster-on-aws-with-kops/
- https://forums.aws.amazon.com/thread.jspa?threadID=286810
THE BLOG
News, lessons, and content from our companies and projects.
41% of small businesses that employ people are operated by women.
We’ve been talking to several startups in the past two weeks! This is a curated list of the top 5 based on the analysis made by our models using the data we collected. This is as fresh as ...


Porto Seguro Challenge – 2nd Place Solution
We are pleased to announce that we got second place in the Porto Seguro Challenge, a competition organized by the largest insurance company in Brazil. Porto Seguro challenged us to build an ...
Adriano Marques
CEO at XNV

Predicting Reading Level of Texts – A Kaggle NLP Competition
Introduction: One of the main fields of AI is Natural Language Processing and its applications in the real world. Here on Amalgam.ai we are building different models to solve some of the problems ...
João Paulo Martins
Data Scientist XNV

Porto Seguro Challenge
Introduction: In the modern world the competition for marketing space is fierce, nowadays every company that wants the slight advantage needs AI to select the best customers and increase the ROI ...
João Paulo Martins
Data Scientist XNV

Sales Development Representative
At Exponential Ventures, we’re working to solve big problems with exponential technologies such as Artificial Intelligence, Quantum Computing, Digital Fabrication, Human-Machine ...

Rodolfo Egarter
COO @ Pluo

Exponential Hiring Process
The hiring process is a fundamental part of any company, it is the first contact of the professional with the culture and a great display of how things work internally. At Exponential Ventures it ...
Rodolfo Egarter
COO @ Pluo
Exponential Ventures annonce l’acquisition de PyJobs, FrontJobs et RecrutaDev
Fondé en 2017, PyJobs est devenu l’un des sites d’emploi les plus populaires du Brésil pour la communauté Python. Malgré sa croissance agressive au cours de la dernière année, ...
Adriano Marques
CEO at XNV

Exponential Ventures announces the acquisition of PyJobs, FrontJobs, and RecrutaDev
Founded in 2017, PyJobs has become one of Brazil’s most popular job boards for the Python community. Despite its aggressive growth in the past year, PyJobs retained its community-oriented ...
Adriano Marques
CEO at XNV

Sales Executive
At Exponential Ventures, we’re working to solve big problems with exponential technologies such as Artificial Intelligence, Quantum Computing, Digital Fabrication, Human-Machine ...
Rodolfo Egarter
COO @ Pluo

What is a Startup Studio?
Spoiler: it is NOT an Incubator or Accelerator I have probably interviewed a few hundred professionals in my career as an Entrepreneur. After breaking the ice, one of the first things I do is ask ...
Adriano Marques
CEO at XNV

Social Media
At Exponential Ventures, we’re working to solve big problems with exponential technologies such as Artificial Intelligence, Quantum Computing, Digital Fabrication, Human-Machine ...
Rodolfo Egarter
COO @ Pluo

Hunting for Unicorns
Everybody loves unicorns, right? But perhaps no one loves them more than tech companies. When hiring for a professional, we have an ideal vision of who we are looking for. A professional with X ...
Rodolfo Egarter
COO @ Pluo
Stay In The Loop!
Receive updates and news about XNV and our child companies. Don't worry, we don't SPAM. Ever.
